Lego: Building Sideways

I saw in the stats for this blog that interestingly—some would say co-incidently—the original MILS plate post was once again dug up from the archives.

Due to some house rules I have up to now ignored, I can no longer display my Lego creations on the hall table in the corridor.

I’m hoping there won’t be any complaints if I display on the pilaster beside my front door. Where usually only names and seasonal things are stuck.

Hence now attempting to invent a vertical MILS plate

A first trial vertical MILS plate only partially covered. With a very basic version of men at work starting the build

The question is how much weight I can hang off such a structure keeps me experimenting. Second, how easy or hard will it be to change the displays?

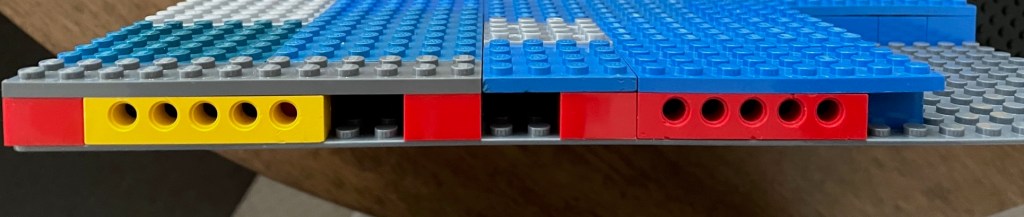
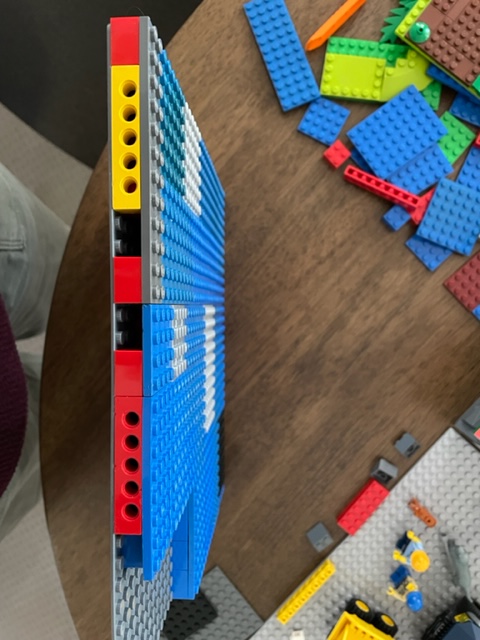
That up there is a thirty-two stud base plate stuck to the wall with five velcro-type fixings. Not ideal as I have already found, as all the places where there aren’t fixings are hard to press down on.

And after being bent in, they bend back and the thing being connected jumps off. It’s even awkward to fix on small plates such as eg 4 x 8s with stuff on them.

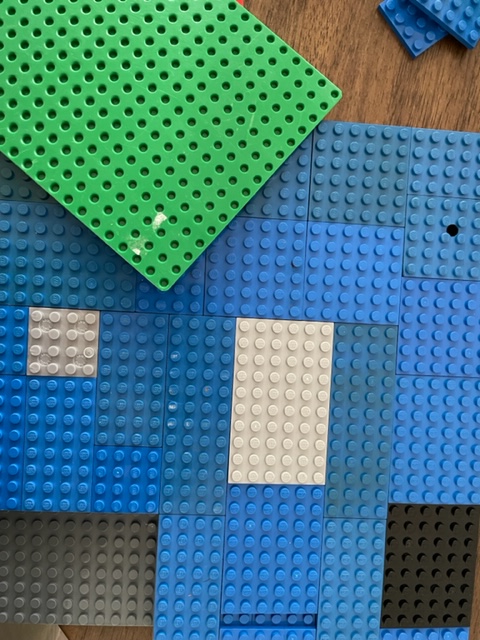
I think I need to get a bunch of 16 x16 plates. build on them, and stick them to the baseplate with strips or 2 x 4 plates. Something like that.

While I’m waiting for a postal delivery, I might break out some old ladders from the vintage fire engine and get the characters onto the next level, since at the moment it reminds me of an old fashioned arcade game.

Blogging Stats: An Outlier

I usually do an annual assessment of this blog where I have a look at what is working and what’s not. This year I have an ‘outlier’ to consider. This is a post that does so well that it outstrips every other post with Views. Even now, eighteen months since it was posted, search engines are still finding it, and still gets between 1-5 Views per week, with so far, over 150 Views in total.

If it was one of my usual non-fiction posts I would be over the moon! Ecstatic, even, to think that so many people appreciate my writing. I would definitely then analyze its every word, tag and category, to see whether I could replicate its success.

Instead I will analyze it for the elements that allowed it to cross over into ‘Lego-technical-expertise-country’. I think what is actually happening is that Lego enthusiasts are hitting on it in the belief that it is one of the xyz posts they’ve heard about explaining a particularly nitty-gritty technique by way of a technicolor video or some such.

When they discover it isn’t what they expected, they just as quickly click away. Giving me a bunch of ‘false-positives’ in the blog’s stats. Lol, I won’t be posting the title of the offending post in this article! I’m not after more ‘false-positives’!

But seriously, when by now more that a hundred and fifty people click away with their expectations unfulfilled, that can start to have repercussions for a blog. Time to do something about it. I’m thinking of combining the information in all three posts pertaining to that subject, and deleting the originals. That way I still have the information available.

Lego: Building a Swamp, 1

Lego road base-plate conversion

Surrounding the island where Bosley and Company have settled, lies a vast wetland of sandbanks, low islands and mostly shallow channels. The only river channel deep enough to take shipping fortunately runs past the west of the island.

But today I’ll be starting part of the swampy landscape using this old road-plate. I realize this is a very old road plate, maybe even vintage. I got it in second hand lot. And base-plates have been hard to get secondhand.

NOTE that on this plate the height of the road surface and the plate surface between the studs is exactly the same. This is what will make it very easy to convert. I’ll be using a third version of my so far favorite technique … the MILS plate!

Surrounding the plate in the photo above are some of the bits and pieces I’ll be using to install a ‘skin’ over the whole plate. And I’ll be trying to save pieces (I never have enough) and time by laying down the bases of the various islands I’m planning as well as water channels as I’ve roughed up below. Scale is 4 studs per square. (I keep all my maps for this project in a Year 1 and 2 maths exercise book. )

rough map of the build

Here I’m about a third of the way. Light blue and grey will be water and mud. The tan places the islands. I’m using black and mid green plates to either fasten the larger plates to the studs or to support them on the flat roadway. To get everything to hang together it helps to connect the landscaping plates to each other with the underlay pieces.

Testing the base layer

This is my base layer. I’ve tested it by pressing down hard on all the plates and discovered two loose 3×3’s. They’ll need better foundations. The hole to the left? I didn’t have enough grey plates of the right sizes and shapes. I fixed it with two grey 1x2s on a black elbow. Pressed it in. It’s good to go.

Comparing this to the map, you’ve seen already that I had to let go of my ideas as to where to place the islands. It’s all right. I will solve that problem in the next installment.

Lego: MILS Base-plate

The minute I saw a Lego base-plate, I knew I’d have to find an alternative.

Underside of Lego base plate in green, my version of a MILS plate in blue etc

Most of the building I’m doing is on my smallish round dinner table. When I have guests stuff has to be able to be moved easily to shelves. Just how weak and bendy the original base-plates are was amply illustrated to me by Darryl of Bevin’s Bricks on Youtube cutting one up with a box cutter.

I already searched through possibilities like glueing base plates on cardboard and building on ordinary plates and joining those with other ordinary plates. Neither of which attracted me. The first because it’s hard to stay accurate. The second because of heavy and awkward builds springing apart when you least expect it. I’ve read about builds grievously falling apart while being transported from one table to the next. Not ideal, in other words.

Then, on one of the FB groups I joined, I saw mentioned the MILS plate as the next development in the search for a strong base plate. Following that up, I saw a good explanation on Bevin’s Bricks. [Though I have again forgotten what ‘MILS’ means. I have a life-long memory glitch in relation to acronyms.]

Me constructing a ‘proper’ MILS base plate right now would’ve meant ordering the required parts, and weeks of waiting on covid-struck postal services in several countries. Even getting supplies by post from my local brick resales outlet a few suburbs away, usually takes a couple of weeks.

Not helped this week that I’m house-bound again, waiting to be told whether I have covid or another lurgy. Well, I know I have a lurgy. Ten days of coughing.

But … I have six alternate-lego base plates, lots of blue 2×2 bricks and red 2×2 bricks that I have no idea where to use, a few 30-year-old Technic 1×6 bricks, and a bunch of blue sun-damaged plates of all sizes. Can I achieve something with them?

I could. Very likely the ordered honeycomb of professionally built MILS base plates is not present in the internals of my sandwich base plate (below) because I spaced the reds and blues according to need, not design. I’m very happy with it and am aiming to put another one together tonight.

Behold my sandwich/MILS base plate.