Modem vs IOS

When I finally knuckled down and dedicated a couple of hours to the problem, I learnt that the trouble was the ever-renewing IOS, macOS Sonoma 14.1.1 in this case, that was refusing to shake hands with the now five year old modem. How is that good for the world to come, Apple.com? We need tech that is compatible to old as well as new.
Let me tell you this image is 20! years! old! I think I made it using one of the first versions of the ProCreate design program installed on an early iPad I had a taste-test of. It represents a techie, of course. How we imagined techies in those far gone days.
First the wait for contact on the help-line. Twenty minutes. Then the wait for my turn with a technician. 45 minutes. By about half an hour of waiting, I settled in, having already spent/used/wasted too much time to want to do it all again at a later date. Nothing has changed in 20 years in that respect.
I don’t know how many people have got an Archer VRI 1600, Version 2 modem but if it was a popular one, there’ll be a lot of people like me out there with modems stunned into silence, even hibernation, by new and brashy operating systems. Hence the long wait. Which is how I comforted myself.
I told the technician helping me reset the system, it is almost as if new operating systems are sweeping the old out to make room for the new.
Madam, she said, we don’t recommend our customers to just update their systems willy nilly.
I wanted to tell her I just do as I’m told, and my technical equipment the same. We upgrade to stay in the game. I don’t know what’s in an upgrade. Who out there is going to explain?
Yeah yeah. I could go to a forum and find out there. But tell me … do you do that?
But anyway the point is moot. Rion gave me a task that needed my attention. Find the xyz in System Settings and tell me what it says.
She is good, knows her stuff, and she’s patient. Took me through the process step by step. Even tested my mobile while we were at it. There, she said at the end, no new modem needed.
Her name is Rion and she works at the TPG call centre, if you need help retreading your modem.
Lego, Bosley’s Builders 6
Cat Tales, 16

Ever seen a cat with a medi-collar on? That’s what they put on at the vet’s before they put me in the carrier. They thought to stop me scratching, licking and biting the bandage. Huh? I am the Hand-of God, I don’t do that sort of stuff.
The vet cut my toe off. Just hanging by a thread, she said. So I’m a two-toe wonder now. Most cats that happens to, lose their whole foot, she said. That’s all while I’m still caged in the recovery room.
They gave me wet food. I hate wet food. I’d rather eat a spiny gecko tail. I turned up my nose and the vet nurse laughed. I turned my back then.
As soon as I heard my human in the waiting room, I started a racket. Yowling and throwing myself against the wire front of the cage.
“Take her home, for peace’s sake,” said the vet. “Come back later to pay and for the meds.”
That’s what happened. Me in the shed. The pernickety old woman fetching the meds which she now knew how to toss down my throat. The vet nurse had demoed presumably. I saw her apply the method to some other poor creature. One good thing, to get these meds into me, the pernickety old woman had to take the collar off me.
To open my mouth, the pernickety old woman squeezed my jaws apart at the joints. Then, having tossed the goods into the gulch, she clenched my jaws together to stop me spitting them out! Honestly, where do humans learn this tricks?
But, as a treat, I was then allowed to sleep on her bed within the klamboe—that’s the mosquito net—usually a serious no no. On the understanding that I wouldn’t rip the bandage off.
I gave her my best expression of disdain. Why would I rip off the bandages? Did you know cats can do 247 different expressions? Proven fact. A couple of people studying cats in a cat cafe. In Japan. You find out more? Just do that thing humans always do when they want to know something, using the thing you talk into.

Lodestar 42, Ahni in the Night
Modem troubles
My modem is ‘on the blink’, which is a colloquial way of saying it has started to fail. Sometimes its little lights work well and my computer has an internet connection.
Sometimes they’re blinking and I know then there’s a gappy reception and goodbye to getting anything done online except by mobile. That means one-fingered typing for me.
I’m sitting on instalment 16 of Cat Tales, with no way that I have found of getting the photos from the computer onto my phone.
People will tell me the cloud and/or dropbox. Seems like neither of them like going in reverse. Mind you that could be a personal bugbear.
Anyway, there it is. Another hold-up.

Now to access the other photo …
Lego: Building a Swamp, 1

Surrounding the island where Bosley and Company have settled, lies a vast wetland of sandbanks, low islands and mostly shallow channels. The only river channel deep enough to take shipping fortunately runs past the west of the island.
But today I’ll be starting part of the swampy landscape using this old road-plate. I realize this is a very old road plate, maybe even vintage. I got it in second hand lot. And base-plates have been hard to get secondhand.
NOTE that on this plate the height of the road surface and the plate surface between the studs is exactly the same. This is what will make it very easy to convert. I’ll be using a third version of my so far favorite technique … the MILS plate!
Surrounding the plate in the photo above are some of the bits and pieces I’ll be using to install a ‘skin’ over the whole plate. And I’ll be trying to save pieces (I never have enough) and time by laying down the bases of the various islands I’m planning as well as water channels as I’ve roughed up below. Scale is 4 studs per square. (I keep all my maps for this project in a Year 1 and 2 maths exercise book. )


Here I’m about a third of the way. Light blue and grey will be water and mud. The tan places the islands. I’m using black and mid green plates to either fasten the larger plates to the studs or to support them on the flat roadway. To get everything to hang together it helps to connect the landscaping plates to each other with the underlay pieces.
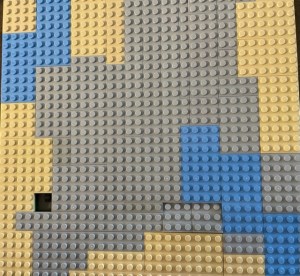
This is my base layer. I’ve tested it by pressing down hard on all the plates and discovered two loose 3×3’s. They’ll need better foundations. The hole to the left? I didn’t have enough grey plates of the right sizes and shapes. I fixed it with two grey 1x2s on a black elbow. Pressed it in. It’s good to go.
Comparing this to the map, you’ve seen already that I had to let go of my ideas as to where to place the islands. It’s all right. I will solve that problem in the next installment.
